Home Improvement

Types of Replacement Windows

Replacement Windows Massachusetts can improve the look of your home and add resale value. They can also lower your energy bills and prevent future damage to the frame.

Replacement Windows

Today’s new window options include styles with blinds tucked between the glass that eliminates the need for dusting and makes cleaning easier. They can also quiet outside commotion to help you relax and sleep better.

If you are replacing windows in your home you will have to decide what style to choose based on a variety of factors including exposure and the look you want. There are two main types of installation: full-frame and pocket. Full-frame installations require removing the old window and installing new framing to accommodate your replacement. These are referred to as new construction windows and typically have nail fins on the edges of the frame to allow them to be fastened directly to your house’s studs.

Pocket installations utilize the existing frame and are slid into place by professional window contractors. These are referred to as replacement windows and can be either flush fin or block-fin. If you have a stucco or block wall and are replacing a window with one of these styles you will want to select a flush fin window that has a sloped sill adapter, which allows the new window to fit into the existing wood sloped sill of your home’s exterior.

You can also use a flush fin window in a stucco wall with the proper flashing details. You may need to install a sloped sill adapter and add some caulking at the bottom of the frame to create an air and water barrier between your new window and the building.

Another thing to consider is the condition of your existing frame. If your frame is in poor condition you will need to use a full-frame replacement window and not a pocket style. If you are installing a new window that is the same size as the old one then a pocket window will be fine.

Another option is to use a full-frame replacement window without a nail fin. This is more common in older homes with siding or stucco and allows you to match your replacement window exactly with the existing frame. However, this type of installation has created enough leak problems in the past that some jurisdictions now require permits to be pulled for the installation and you must have a skilled window installer to make sure your replacement windows are flashed properly.

Insert

When it comes to installing new windows, homeowners have two options: insert windows and full frame replacement. Both installation methods offer advantages and disadvantages, but which one you choose depends on the condition of your current window frames and studs. Learn more about these two installation methods to help you determine the best solution for your home.

Also known as “frame-in-frame” or “pocket window,” insert windows fit within your existing frame and are only used when the exterior cladding, trim and interior of your old windows are still in good shape. This method allows you to preserve the look of your home and upgrade its energy efficiency, durability and overall functionality.

The biggest advantage of this installation method is that it’s much faster and less invasive than replacing the entire frame. Because of this, it’s ideal for older homes with original, solid wood frames that you want to keep.

Another option is block frame windows, which replace the sash only and leave your original frames intact. This installation method is typically done in cases where you’re happy with the size, shape and operating style of your existing windows and when the walls are made from brick or siding.

Like insert windows, they’re installed from the interior and don’t have a nailing fin, but unlike flush fins, block fins extend up the framed wall to help prevent water and air leaks. This feature makes block frame windows an ideal choice for historic and pre-fabricated wall construction, especially in areas with a lot of moisture.
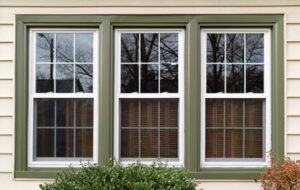
Double-Hung

Double-hung windows are one of the most popular replacement window styles and come in a range of sizes. Their upper and lower sashes slide vertically in separate grooves, making them easily adaptable to most architectural styles. They also allow superior ventilation and control of airflow throughout a home. Cool summer breezes can enter through the bottom sash while hot, stale indoor air can escape through the top sash. This feature is particularly useful in two-story homes and helps improve energy efficiency.

Another advantage of double-hung windows is their ability to be opened from both sides, which allows them to provide better ventilation than other types of replacement windows. This can help reduce harmful fumes from cooking and cleaning, and it’s ideal for those with children in the house. Double-hung windows are also easy to clean. By simply tilting the sashes inward, you can reach even hard-to-reach areas for a thorough cleaning without having to step outside.

On the downside, double-hung windows can be more expensive than single-hung windows. This is because they have more moving parts and are typically built using more complex construction methods. This may lead some homeowners to shy away from these windows, but those who are willing to pay more for increased functionality, a wide range of design options, and better ventilation should be able to find a product they love.

Ultimately, double-hung windows are worth the investment. They are an excellent choice for many different home styles, offer a high level of customization, and can be paired with a variety of frame materials, colors, and finishes to create the look you desire. They also add resale value and can improve your home’s efficiency.

However, if you’re looking for an affordable option that offers the same benefits as double-hung windows, you might want to consider choosing a single-hung window. Single-hung windows are easier to install and do not require as much maintenance or upkeep as double-hung windows. They are also an excellent choice for older homes with outdated windows, which may have lost their argon or krypton seals.

Single-Hung

While single- and double-hung windows are popular options for homeowners looking to replace old windows, the window styles you choose will depend on your home’s needs and space constraints. If you’re looking to increase the size of your window opening, for example, you may want to consider casements or sliding windows as a more appropriate option.

Aside from the aesthetic benefits, double-hung windows offer ventilation and accessibility features that make them ideal for homes with second floors. They also allow you to clean the inside and outside of the sash from either side of your home, which is especially helpful for homeowners with small children or pets.

On the other hand, single-hung windows are more straightforward and less expensive to purchase because they have fewer moving parts. In fact, they’re often used in new home construction because their simple design makes them easy to install and affordable for builders.

Because single-hung windows open only from the bottom, they’re also ideal for areas where an outward-opening window might obstruct pathways or patios. They’re also more energy-efficient than their double-hung counterparts because the movable sash limits air leakage and infiltration.

Another important distinction to keep in mind is that replacement windows are designed for use on existing frames, whereas new construction windows are built for new building projects and have fins that must be attached to the frame. If you’re planning a new build and would like to include windows in the wall frame, new construction windows are the best choice.

Finally, insert windows are similar to new-construction windows, but they’re installed into an existing frame rather than a full wall. They’re typically only used with original solid-wood frames that are in good condition, and they involve pocketing the fully assembled window into a space in the wall. They’re generally used in situations where there are structural or rot concerns that would otherwise prevent new construction windows from being installed.

Concrete Contractor

How a Bricklayer Lays Bricks

Bricklayers Perth is a skilled tradesperson who constructs, repairs and maintains walls, houses, and other building structures. They work with clay bricks, concrete blocks, and mortar.

Some duties include interpreting work orders, measuring working areas, and using a trowel to lay bricks and mortar. They also may need to lift heavy materials and erect scaffolding.

Bricks are strong, classic, and timeless, making them an excellent building material for various structures. But bricklaying is a skill that requires careful attention and planning to achieve a professional finish. Bricklayers must also have high stamina and strength to perform productive work through long shifts and handle weather conditions.

To begin, bricklayers must prepare the site by clearing and cleaning it. They then need to lay a mortar bed on the ground, slightly thinner than the individual bricks. This mix of concrete and sand should be spread out using a trowel until it is evenly coated.

Once this base has dried, the first course of bricks can be laid. This should be done along a level line, ensuring that the bricks you lay will align. A pin can set this level line by inserting it into the mortar at one end of the wall and stretching it out. This should be done to each of the ends of the wall, and then once the line has been set, it can be lifted and moved up or down with each new course.

Each brick is then placed on the mortar, using a bolster chisel and lump hammer to ensure they are positioned correctly. Once the brick has been pressed down, it needs to be struck and brushed with a “jointer,” a tool that is a piece of tubing of the same size as your joint spacing bent into an “S” shape. This is rubbed across the mortar joints to smooth them out and create a neater finish.

As each course is laid, the bricklayer must ensure that the line is kept straight by checking it with a spirit level, tapping each brick if necessary. As a guide, the first brick of each course should be laid with a half brick at either end to avoid the vertical joints lining up and weakening the structure. Each course should follow this technique until the whole wall is complete.

The mortar used by bricklayers must have the right consistency to keep the layers of bricks together and withstand the structure’s weight. It also must contain the correct amount of moisture to prevent it from being too thick and unworkable during construction sessions.

Mortar can be bought in a dry, pre-mixed form that is combined with water, or it may be mixed on-site. A mixer is useful for creating the ideal mixture but can be expensive to purchase and maintain. The most common ingredients are lime, cement, and sand. However, a variety of additives are available for the mason to include in his mix. These additives can help make the mortar more durable, improve its ability to bond with other materials and increase its overall strength.

Whether mixing your mortar or purchasing pre-mixed, it’s important to follow the instructions on the bag to ensure that the ratio of water to dry material is correct. Most mortar mixes require around 6 quarts of water per 50lb bag. The ingredients should be stirred with a hand or power mixer until the mixture reaches a workable consistency. Once the mortar is mixed, it should hold its shape if you dip a trowel into it and pull it upward.

Once the mortar has been mixed, it should be allowed to rest. This allows the ingredients to rehydrate and bind together. It’s possible to speed up this process by adding a small amount of water. However, this is not recommended as it can cause the mortar to become too wet and difficult to work with.

A bricklayer should test the consistency of his mortar before he uses it. This can be done using a trowel or gloved hand to scoop up a small portion of the mixture. The mortar is ready to use when it holds its shape and does not slide off the trowel or crumble easily.

Some bricklayers prefer to mix their mortar to ensure that the ratio of ingredients is correct and that they can control the quality of the finished product. While this task is time-consuming, producing quality brickwork is often worth the effort.

When laying the first course of bricks, keeping a level and tape measure with you is a good idea. This will help you keep the wall straight as you go. After each brick is set, check it with the level and ensure the mortar underneath and on top of each brick is even. Continue to add bricks to your wall, taking care to butter the ends of each brick and gently press it into place with the trowel handle until it is firmly bedded into the mortar. Once the first course is laid, lift up the guideline for the next row and repeat the process.

Unlike modern smooth bricks, face bricks are wire-cut and have a textured surface. They are also made of a mix of clays with different characteristics. Some are fired at lower temperatures to make them stronger, while others are fired at higher temperatures to give the brick a lighter texture and better color. There are also many different sizes and colors of face bricks available.

Masons use various materials to build buildings, including bricks and concrete blocks. A mason’s job involves many tasks, from laying bricks and pre-cutting stones to mixing mortar and preparing the building site. Many masons start as bricklayers, where they learn the fundamental skills of masonry work.

The craft of bricklaying is complex and requires years of study and apprenticeship to master. More masons need to receive adequate training and knowledge of traditional bricklaying techniques. Inadequate training has resulted in the use of modern bricklaying materials, such as ordinary Portland cement (OPC), which is inappropriate for traditional brickwork and can lead to the deterioration of the bricks themselves.

In addition to the basic skills needed for bricklaying, masons must understand and be able to interpret the nuances of their material. They must know the characteristics of various clays and their varying physical properties, such as absorption, weight, density, chemistry, and chemical composition. They must be able to evaluate and select the appropriate brick for each project based on several factors, such as texture, color, size, and surface finish.

A bricklayer’s work can leave dust and debris, especially when the project involves exterior walls. It’s important to clean up properly so the brick stays intact and doesn’t develop cracks or other problems.

The first step is wetting the brick with a garden hose before applying any cleaning solvents. This will help prevent water damage if the brick is left dry and exposed to the elements.

Once the brick is wet, a basic soap solution or vinegar can clean off dirt and other substances. This is an effective way to remove basic stains from the surface of the brick and can be done regularly to keep your property looking its best.

More difficult stains, such as mold and mildew, may require more serious cleaners. A bleach mixture can be effective for this purpose, as it will dissolve and wash away these substances without damaging the brick.

Muriatic acid is also an effective cleaner for brick, but it is important to follow safety precautions when using this substance. This chemical can be dangerous to touch and should only be used in a well-ventilated area where the fumes can’t reach other surfaces, such as wood or metal.

For stains that are particularly stuck on, such as grease or grass stains around your home’s foundation, you can use a commercial brick-and-mortar detergent. This product can be sprayed onto the brick and scrubbed with a brush to loosen and remove stubborn materials.

You can use a commercial masonry cleaner with hydrochloric acid for more severe stains, such as vanadium staining from rusting metal fixtures in your home. This powerful substance can be dangerous, so you should always wear gloves and goggles when applying it to brick and ensure it is not in contact with other surfaces that could react negatively to the acid. You should also test the solution on a small area of your brick before proceeding with the entire application.