Home Improvement

Frameless Glass Shower Doors

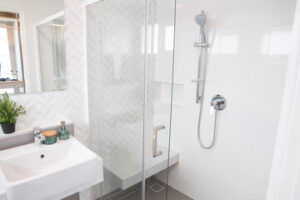
Frameless Glass Shower Doors are becoming more popular for homeowners looking to upgrade their bathrooms. They offer a sleek, modern look and are easy to clean. They can also add value to your home.

Shower Doors

However, they can be more expensive than framed shower doors. Additionally, they can take longer to install than framed doors. This is because frameless shower doors need precise measurements to ensure a perfect fit. Visit https://glassgovernor.com/ to learn more.

A frameless glass shower door is an excellent upgrade for any bathroom. It makes the room feel more spacious and opens it up for more natural light. However, it may cost more to install than a traditional framed shower. The reason is that frameless doors require specialized hardware that isn’t usually sold in home improvement stores. Also, the glass is more expensive because it needs to be tempered and a protective coating applied. Adding this to the total installation cost can increase your budget significantly.

If you want to save money on your frameless shower doors, look for a company that specializes in custom cuts. This will ensure that the glass is precisely cut, reducing the chances of leaks. Then, the installer can caulk around the edges of the glass to seal it. A clear vinyl sweep can be installed at the bottom of the shower for additional leak protection.

You can find a lot of different styles for glass shower doors, including those with a curved track and those with handles or knobs. They are available in a variety of tints, finishes, and coatings to match any style. You can even have a color or pattern added to the glass to make it more unique. Regardless of the style you choose, you should always get a quality door from an experienced, reputable company. Otherwise, you could end up with a costly renovation due to poor workmanship.

Frameless glass shower doors are easier to keep clean than framed ones because they have less nooks and crannies where mold and mildew can grow. However, it’s important to squeegee the doors after each use to prevent soap scum and water spots from forming.

While the cost of a frameless shower can be higher than that of a framed one, you’ll still save money by choosing a simpler design and installing it yourself rather than hiring a contractor. You’ll also avoid paying extra fees for testing and remediation of hazardous materials. In addition, a general contractor’s overhead and markup will add to your overall costs.

Durability

Unlike the metal shower frames that can rust and detract from the appearance of your bathroom, frameless glass showers are a long-lasting and durable option. This is due to the fact that they are typically made from tempered glass, which is up to 10 times stronger than standard annealed glass. Tempered glass is also safer to handle than annealed glass, as it is less likely to break into dangerous shards.

The durability of frameless glass showers is further enhanced by the use of high-quality hardware. This includes hinges and handles, which should be made from corrosion-resistant materials. Additionally, the hardware should be aesthetically appealing and easy to maintain.

Frameless shower doors are easier to clean than framed ones because they have less nooks and crannies that can collect soap scum and mildew. However, they do not eliminate the need to clean your bathroom completely, and it is still important to squeegee after each use to prevent mold and mildew buildup.

In order to prevent water leaks, it is essential that the installer of your new shower uses a silicone caulk along the edges of each fixed panel. This will help to keep water from seeping through the shower doorway when it is closed. In addition, you should ask your contractor to use a thick bead of caulk at the corners of the fixed panels and on the frameless glass enclosure to prevent water from seeping out.

Installing a frameless glass shower is a complex job that is not for the weekend warrior handyman. It is best to leave the installation to a professional, as the slightest mistake can crack or chip your new shower door. This could be expensive and may require replacement of the door.

When choosing a contractor to install your new frameless glass shower, be sure that they are licensed and insured. Also, make sure that they are familiar with the requirements for installing frameless showers in your state, as there are a number of regulations that must be followed to ensure the safety of you and your family. Finally, it is recommended that you choose a contractor with experience installing frameless glass showers. This will give you peace of mind that they know what they are doing and will have the necessary tools to complete the job correctly.

Appearance

Frameless shower doors can add elegance to a bathroom design and improve the flow of natural light. They are also more durable than framed shower doors and require less maintenance. They are also an affordable upgrade for many bathrooms.

These glass doors are available in a wide variety of colors, shapes, and textures. If you are looking for a specific appearance, talk to your design consultant about the possibilities. They can guide you through your options and help you select the best door for your space.

Framed and frameless shower designs differ in their choice of hardware, which can influence the appearance of the glass. While framed shower doors use aluminum trim, frameless enclosures have chrome or nickel trim instead. The trim is usually a square or rectangular shape and can be in either satin or polished finish.

The doors themselves are usually made from tempered glass, which is thicker and more resistant to breakage. Tempered glass is more likely to shatter into small, blunt-edged pieces, which will reduce the risk of injury compared to sharp jagged shards of regular glass. However, even if you have a frameless glass shower, it is important to ensure that the doors are properly installed. Check them regularly for cracks and chips, and never slam the doors.

While it is possible for frameless glass shower doors to shatter, this is rare and usually the result of accidents or sudden changes in temperature or humidity. In addition, the lack of a frame means that shattered glass is unlikely to get into your water supply or cling to you when you bathe or shower.

Because of their minimalistic design, frameless glass shower doors are easier to clean than framed doors. They have fewer nooks and crannies where mold and mildew can hide, and they are easy to wipe down after each shower with a squeegee or sponge.

A frameless glass shower can reveal bathroom tiles that are otherwise hidden by a curtain, which can make the room feel larger and brighter. In addition, the clear glass can show off marble tile or stonework. Adding a bench or knee walls to your frameless shower enclosure can further enhance the appearance of the room.

Installation

If you’re planning to install a frameless shower door in your home, it’s best to have a professional handle the installation. The process is complex and requires many tools and supplies, including a drill, hammer or mallet, caulk gun, and waterproof silicone sealant. Considering that even the slightest mistake can lead to a shattered glass door, it’s not something you want to do on your own.

Before starting the installation, clean the shower opening thoroughly. Remove any existing shower doors and hardware from the wall. You should also make sure the area is dry and free of debris before proceeding. The next step is to assemble the shower hardware kit according to its instructions. Once the kit is assembled, it’s time to install the bottom track and the side jambs. After the tracks and side jambs are in place, you can begin installing the hinges. These can be either regular or pivot hinges, depending on your preference. You should also add a door guide at this point.

Once you’ve completed the installation of the track, side jambs, and hinges, it’s time to add the door. You can choose between a sliding or a bi-fold door. Once you’ve decided on which type of door to get, it’s important to take measurements before ordering the glass panel and ensuring that everything will fit together properly.

Some people are concerned that the lack of a frame makes these showers more likely to break or shatter during normal use. However, this is a very rare occurrence, especially if the doors are properly installed and used. In addition, the shower walls are usually reinforced with fiberglass or another material that is much stronger than glass, making them very resistant to damage.

Frameless showers are also easier to keep clean than their framed counterparts. They have fewer nooks and crannies for mold to grow, and cleaning is as simple as wiping down the doors and glass with a squeegee every day after showering. If you want to save money on installation and maintenance costs, consider using a frameless shower enclosure in your bathroom.

Home Improvement

Floor Refinishing Basics

Refinishing is the process of adding a new coat of finish to your hardwood floors. You’ll need to remove all furniture, and cover any fixtures or appliances with painters tape to protect them from sanding dust.

Sanding removes scratches, nicks, discoloration and other imperfections from floorboards. Stain is then applied followed by a topcoat. Contact Floor Refinishing Westchester NY now!

Before applying any new finish, it’s important to sand the floor. This can be done with a hand-held or orbital sander or by renting a power sander. Either way, it is best to wear a dust mask and a HEPA-level N95 respirator during the entire sanding process because wood shavings can get into your sinuses and cause irritation.

It’s also a good idea to use a dustless sanding system, which can save you time and money. Typically, these machines are equipped with filters to help reduce the amount of dust that is created. However, if you’re a beginner, it is recommended that you practice on some old boards to make sure you have the hang of it before using a machine on your floors.

After the sanding is completed, it’s recommended that you vacuum and clean the floor thoroughly. If your floor has any damaged areas that require repairs, this is the ideal opportunity to do it. For example, if the damage has gone through the veneer and reached the wood itself, this would be the perfect time to patch and stain.

If the damage is minimal, you may not need to sand the floor. Instead, a screen and recoat may be necessary. This is a process that involves roughing up your wood floor with a coarse sanding screen and then applying a new protective covering. This is much less expensive and faster than a full refinish.

A recoat is ideal for minor damage, as it will prevent further damage to the hardwood floors and will give them a fresh new look. However, if the damage is extensive or if the boards are showing signs of warping, a complete refinish is required.

Once the floor has been sanded, it’s best to let it dry completely before replacing any furniture. You should also apply plastic tarps over any doors or vents to keep the dust from spreading to other parts of your home. It’s also a good idea to remove the base shoe molding along the walls, as this will allow you to easily reach the wall with your sanding equipment.

Staining

Staining is the next step in floor refinishing. This is where you can give your floors a new color, and some homeowners choose to stain their floors a dark shade. You can also use stain to hide any marks or scratches in your wood floors. If you plan on staining your wood floors, it is best to consult the manufacturer’s instructions for proper preparation. In many cases, the stain must be sanded to bare wood prior to applying.

To sand the floors, you will need to use special specialized equipment to sand away the existing finish. Once the floor is sanded, it will need to be cleaned again to remove any remaining dust.

Before you can apply any stain, it is recommended that you test the color on a small area of your wood flooring. This is a good way to see what the final color will look like and whether it matches your current decor.

During the actual staining process, you will need to work in two-foot sections at a time to maintain a “wet edge.” It is important to follow the grain of the wood when applying the stain, and you may want to use a paintbrush to cut in around the baseboards. Once the stain is applied, let it dry according to the manufacturer’s directions. If you aren’t happy with the results, you can always apply a second coat of stain to your wood floors.

After the stain has dried, you will need to seal your hardwood floors to protect them from damage. You can use either an oil-based or water-based polyurethane. If you decide to use a water-based polyurethane, it is recommended that you choose a low-VOC formula.

Once the polyurethane is applied, it will need to dry for about 24 hours before you can walk on your hardwood floors again. During this time, you should avoid using any cleaning products that may damage the floor. It is also important to keep pets and children off the hardwood floors while they are drying. If they are walked on, it can cause the polyurethane to flake and peel.

Sealing

A good floor sealant creates a barrier between the wood and moisture, protecting it from warping, buckling, or discoloration. It also helps the floors to resist staining and scratching. Floor sealants can be applied as a DIY project or by professionals. Professionals have specialized equipment like drum sanders to prep the floors and experience in determining how many coats are needed for the best results.

Before applying a sealant, it’s necessary to make sure the floors have had all stains, scratches, and other visible damage removed. Depending on the extent of the damage, this may require sanding. While it’s possible to use hand sanders, a large rotary sander is more efficient and gives better results. It’s also important to vacuum and wipe the floors to remove all dust and debris before applying a sealant.

Once the floors are completely sanded and have been vacuumed and wiped, they’re ready for the first coat of sealant. A polyurethane sealant is usually the best option for hardwood floors. It’s available in a variety of sheen levels and provides an attractive and durable finish. However, it’s important to use a water-based sealant as oil-based ones can yellow with age and can also distort the color of any future staining.

The first coat of sealant should be applied using a roller, following the grain of the wood as it goes on. It’s important to allow the first coat to dry for at least six hours. After the first coating, it’s a good idea to lightly sand the surface again with a fine grade of sandpaper. A #220 sandpaper will work well for this. Once again, it’s important to wear breathing protection for this step as the polyurethane dust can be harmful.

After a second coat of sealant has been applied, the floors should be allowed to dry again for at least eight hours. Once the sealant is completely dry, it’s a good idea to wait until the following day before walking on the floors or replacing furniture.

Buffing

Buffing is a vital step in the floor refinishing process, bridging the gap between coarse and fine sanding and the application of a new sealant or finish. This technique enhances the natural beauty of wood floors and provides a durable foundation for future protection. It’s important to understand the mechanics and techniques of buffing in order to properly execute this crucial step.

Before beginning the buffing process, it’s essential to ensure that all sanding steps have been completed and that the floor is fully dry. Failure to do so can lead to scratches and uneven finishes. Additionally, it’s critical to thoroughly clean the floor before buffing and to use a clean buffer pad. Finally, it’s important to maintain consistent pressure and to move the buffer slowly and evenly across the surface of the floor.

It’s also important to select the correct abrasive for each stage of buffing. Using a grit that is too coarse can leave behind scratches, while using a grit that is too fine may not be effective at all. Lastly, it’s essential to change the abrasive regularly as it wears down. Failure to do so can result in an uneven finish and prolong the buffing process.

Once the floor has been buffed, it’s important to allow it to completely dry before applying a new coat of polyurethane. This process can be expedited by using a multi-disc sander that has been equipped with a screen, which will only lightly abrade the top layer of polyurethane and not touch the actual wood.

In addition to sanding, it’s also important to maintain regular maintenance on your wood floors. This includes regularly sweeping and mopping, as well as periodic waxing. Buffing and waxing can extend the life of your wood floor significantly, and will help to prevent the need for refinishing in the future.

Wood floors that are not urethane finished should be waxed twice per year. Before applying wax, the floor should be swept and mopped with an appropriate cleaner and then allowed to dry. Then, the floor should be buffed by hand or with a machine and then a light coat of wax applied according to product instructions.

Home Improvement

Types of Replacement Windows

Replacement Windows Massachusetts can improve the look of your home and add resale value. They can also lower your energy bills and prevent future damage to the frame.

Replacement Windows

Today’s new window options include styles with blinds tucked between the glass that eliminates the need for dusting and makes cleaning easier. They can also quiet outside commotion to help you relax and sleep better.

If you are replacing windows in your home you will have to decide what style to choose based on a variety of factors including exposure and the look you want. There are two main types of installation: full-frame and pocket. Full-frame installations require removing the old window and installing new framing to accommodate your replacement. These are referred to as new construction windows and typically have nail fins on the edges of the frame to allow them to be fastened directly to your house’s studs.

Pocket installations utilize the existing frame and are slid into place by professional window contractors. These are referred to as replacement windows and can be either flush fin or block-fin. If you have a stucco or block wall and are replacing a window with one of these styles you will want to select a flush fin window that has a sloped sill adapter, which allows the new window to fit into the existing wood sloped sill of your home’s exterior.

You can also use a flush fin window in a stucco wall with the proper flashing details. You may need to install a sloped sill adapter and add some caulking at the bottom of the frame to create an air and water barrier between your new window and the building.

Another thing to consider is the condition of your existing frame. If your frame is in poor condition you will need to use a full-frame replacement window and not a pocket style. If you are installing a new window that is the same size as the old one then a pocket window will be fine.

Another option is to use a full-frame replacement window without a nail fin. This is more common in older homes with siding or stucco and allows you to match your replacement window exactly with the existing frame. However, this type of installation has created enough leak problems in the past that some jurisdictions now require permits to be pulled for the installation and you must have a skilled window installer to make sure your replacement windows are flashed properly.

Insert

When it comes to installing new windows, homeowners have two options: insert windows and full frame replacement. Both installation methods offer advantages and disadvantages, but which one you choose depends on the condition of your current window frames and studs. Learn more about these two installation methods to help you determine the best solution for your home.

Also known as “frame-in-frame” or “pocket window,” insert windows fit within your existing frame and are only used when the exterior cladding, trim and interior of your old windows are still in good shape. This method allows you to preserve the look of your home and upgrade its energy efficiency, durability and overall functionality.

The biggest advantage of this installation method is that it’s much faster and less invasive than replacing the entire frame. Because of this, it’s ideal for older homes with original, solid wood frames that you want to keep.

Another option is block frame windows, which replace the sash only and leave your original frames intact. This installation method is typically done in cases where you’re happy with the size, shape and operating style of your existing windows and when the walls are made from brick or siding.

Like insert windows, they’re installed from the interior and don’t have a nailing fin, but unlike flush fins, block fins extend up the framed wall to help prevent water and air leaks. This feature makes block frame windows an ideal choice for historic and pre-fabricated wall construction, especially in areas with a lot of moisture.

Double-Hung

Double-hung windows are one of the most popular replacement window styles and come in a range of sizes. Their upper and lower sashes slide vertically in separate grooves, making them easily adaptable to most architectural styles. They also allow superior ventilation and control of airflow throughout a home. Cool summer breezes can enter through the bottom sash while hot, stale indoor air can escape through the top sash. This feature is particularly useful in two-story homes and helps improve energy efficiency.

Another advantage of double-hung windows is their ability to be opened from both sides, which allows them to provide better ventilation than other types of replacement windows. This can help reduce harmful fumes from cooking and cleaning, and it’s ideal for those with children in the house. Double-hung windows are also easy to clean. By simply tilting the sashes inward, you can reach even hard-to-reach areas for a thorough cleaning without having to step outside.

On the downside, double-hung windows can be more expensive than single-hung windows. This is because they have more moving parts and are typically built using more complex construction methods. This may lead some homeowners to shy away from these windows, but those who are willing to pay more for increased functionality, a wide range of design options, and better ventilation should be able to find a product they love.

Ultimately, double-hung windows are worth the investment. They are an excellent choice for many different home styles, offer a high level of customization, and can be paired with a variety of frame materials, colors, and finishes to create the look you desire. They also add resale value and can improve your home’s efficiency.

However, if you’re looking for an affordable option that offers the same benefits as double-hung windows, you might want to consider choosing a single-hung window. Single-hung windows are easier to install and do not require as much maintenance or upkeep as double-hung windows. They are also an excellent choice for older homes with outdated windows, which may have lost their argon or krypton seals.

Single-Hung

While single- and double-hung windows are popular options for homeowners looking to replace old windows, the window styles you choose will depend on your home’s needs and space constraints. If you’re looking to increase the size of your window opening, for example, you may want to consider casements or sliding windows as a more appropriate option.

Aside from the aesthetic benefits, double-hung windows offer ventilation and accessibility features that make them ideal for homes with second floors. They also allow you to clean the inside and outside of the sash from either side of your home, which is especially helpful for homeowners with small children or pets.

On the other hand, single-hung windows are more straightforward and less expensive to purchase because they have fewer moving parts. In fact, they’re often used in new home construction because their simple design makes them easy to install and affordable for builders.

Because single-hung windows open only from the bottom, they’re also ideal for areas where an outward-opening window might obstruct pathways or patios. They’re also more energy-efficient than their double-hung counterparts because the movable sash limits air leakage and infiltration.

Another important distinction to keep in mind is that replacement windows are designed for use on existing frames, whereas new construction windows are built for new building projects and have fins that must be attached to the frame. If you’re planning a new build and would like to include windows in the wall frame, new construction windows are the best choice.

Finally, insert windows are similar to new-construction windows, but they’re installed into an existing frame rather than a full wall. They’re typically only used with original solid-wood frames that are in good condition, and they involve pocketing the fully assembled window into a space in the wall. They’re generally used in situations where there are structural or rot concerns that would otherwise prevent new construction windows from being installed.