Home Services

Mold Inspection – What You Need to Know

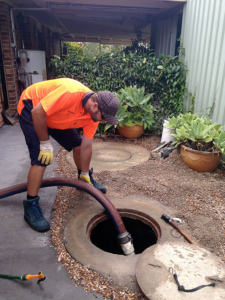
Mold Inspection Staten Island determines whether visible signs of mold are present in your home and the types of fungi that may be growing there. Your inspector will also take air and surface samples and send them to a laboratory for analysis.

The simplest sample is a swab, which immediately determines the presence of fungal spores but not the specific types. Air testing is also common and more accurate than swab sampling.

As the first step in a mold inspection, a qualified inspector will visually examine the entire building. This will include a complete walk through the interior and exterior of the property with special focus on basements, attics, and areas of moisture intrusion.

The inspector will look for visible signs of mold growth such as dark spots, green or gray streaks, black specks, and white fluffy formations (not to be confused with a mineral formation called efflorescence). Musty odors and other indications of excess humidity are also important clues to the presence of mold in a home.

If the inspector discovers evidence of a potential mold problem, they may recommend air and surface sampling to determine if mold is present in the indoor air. This can be a costly process and is often unnecessary. If the mold problems are only limited to one area of the home, a limited visual examination can be used instead.

Xenia’s Mold Inspection Checklist makes it easy for real estate professionals to identify and address mold issues in properties before they are sold. If left untreated, mold can damage a property and cause health issues for residents. The inspection checklist allows real estate professionals to get the issues resolved before completing the sale and save the buyer the cost of remediation.

Mold problems can also be expensive to fix, and they can significantly decrease the value of a property. For this reason, buyers should always get a mold inspection prior to buying a property. Mold inspections can be completed by qualified, certified inspectors who use a thorough checklist and scientific methods to solve mold problems.

It is possible to prevent mold growth with regular maintenance and regular cleaning of the property. It is recommended that homeowners clean gutters regularly, repair leaky roofs promptly, and ensure proper ventilation in bathrooms and other areas prone to moisture. In addition, dehumidifiers can be used to help control moisture levels. The most effective way to reduce the risk of mold is to eliminate the underlying moisture issue that promotes it.

Air Sampling

In order to determine the concentration of mold spores inside a building, it is often necessary to take air samples. This is especially important in homes that have recently undergone any sort of water damage or flood. In order to ensure the integrity of the sample, it is crucial that all windows remain closed (except during normal entry and exit) during the sampling period. Also, the indoor air should be sampled at the same time as the outdoor air in order to provide a valid comparison.

This process typically involves a pump, a measurement device, and a spore collector. The spore collector is filled with a solution that contains a preservative. A cellulose swab is then inserted into the device and allowed to collect spores. Once the swab is full, it is removed and sent off to a laboratory for analysis. In order to ensure that the swab is free of bacteria and other contaminants, the mold inspector should clean and sterilize his or her hands before collecting the sample.

The inspector will also likely take surface samples in any areas of concern. This is because it is not always possible to know whether or not a specific area of visible apparent mold is actually mold, or simply a mineral formation such as efflorescence.

Depending on the type of mold, further tests may be required. These tests can include microscopic examination of the sample, identification of a specific species of mold (if known), and/or a test for mVOCs. In some cases, the presence of mVOCs can indicate that a problem is due to an ongoing moisture issue and not due to an existing mold issue.

A professional mold inspection is a great way to get peace of mind before you move into your new home. It can also be a vital step in doing your due diligence prior to purchasing a home that you are thinking about selling. Using an independent inspector is the best way to make sure that you are not being taken advantage of by someone who has a financial interest in the mold remediation process.

Surface Sampling

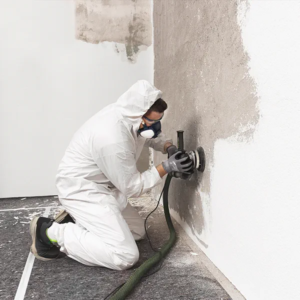
Surface sampling is an important part of a mold inspection. This is because it can help to identify the presence of fungi, which may be missed by visual assessment. During a surface sample, a swab is used to collect a small amount of material from the affected area. This is then sent to a lab for testing. The lab can then determine whether the swab contains mold and what species of mold it does contain.

The swab is usually made of cellulose and comes inside a plastic tube container. The swab is then moistened with a preservative, which is stored in an ampoule at one end of the tube. When the swab is pressed against the surface of the affected area, the preservative helps to prevent the growth of new microorganisms on the swab. The swab is then placed back into the tube and sent to the laboratory for analysis.

Various types of surface samples can be collected in a mold inspection, depending on the specific needs of the project at hand. There are kits that provide all or most of the necessary items needed to collect the samples and send them off to the laboratory for analysis. These kits typically include the sample media, shipping supplies, forms and instructions.

For a general mold inspection, a tape sample is often the best method for determining the type and quantity of visible mold present on a surface. A small piece of a tape is applied to the surface being tested and a chain-of-custody document is recorded with a sample number, location, date and time stamp. A swab sample can also be taken from the visible mold using a special sampling device known as a “spore trap.” A low volume air pump pulls air into a cassette that holds a slide with adhesive. Both viable and non-viable spores stick to the slide, which is then read under a microscope to determine the species and quantity of mold present.

In addition to the sampling methods outlined above, it is possible for inspectors to use thermal imaging cameras to scan hard-to-reach areas, such as behind walls and in wall cavities. In some cases, these devices can even be used to locate leaks.

Laboratory Testing

Whether you’re a home buyer and need to schedule a mold inspection as part of your due diligence, or a homeowner that’s experiencing symptoms such as musty odors, visible mold growth or water damage, laboratory testing may be necessary. Mold spores are easily spread by air and can land on damp surfaces inside your home, where they can continue to grow and thrive. While laboratory tests can help identify the type and quantity of mold spores present, they are never a substitute for a visual inspection.

There are two main types of lab tests used for mold: air and surface. Both require samples to be collected and sent to a laboratory for analysis, with results typically available in 10 days. In general, air samples are taken using a special pump that draws a sample from the atmosphere in a room or specific area. A spore count then determines the amount of fungus in the air and can identify specific fungi such as Stachybotrys or Chaetomium. Surface samples are taken using a petri dish-style kit that identifies the presence of one or more common mold species. A sample is taken and placed in a container for shipping to the lab, and the results are analyzed with a microscope to identify the specific species of mold.

Once results are available, the inspector will discuss the findings with the client and recommend a course of action. This may include performing a remediation plan to safely remove existing mold and prevent it from returning, or taking steps to ensure the root cause of the problem is fixed, such as fixing leaks promptly, cleaning gutters, and ensuring proper drainage around the house.

While a mold inspection falls outside of InterNACHI’s Residential Standards of Practice, the use of thermal imaging and moisture testing can make this an excellent service to offer to clients. Especially when combined with a thorough visual inspection, mold testing can provide valuable clues to hidden problems that might otherwise go unnoticed. It’s a great way to provide peace of mind for your clients and ensure that you’re offering the services that your customers deserve.

Home Services

Septic Tank Services Boost Property Value

A well-maintained on-site sewage system can significantly boost property value. Homeowners can help by scheduling maintenance, keeping a service history, and practicing water efficiency. Click the Septic Tank Services Near Me to learn more.

The septic tank removes solids from household wastewater before it enters the soil absorption field. It is important to keep the tank pumped regularly. When a pumper arrives, make sure they access the tank through the large central maintenance hole. Pumping through the inspection ports can damage baffles and result in incomplete sludge and scum removal.

Septic tank pumping is one of the most important aspects of septic system maintenance. Over time, solid waste and sludge build up in the tank, leading to clogs and system failure. Pumping services remove these accumulated materials from the tank, which can extend the life of the septic system and reduce costs.

Most septic systems contain an underground storage tank for sewage waste in homes that aren’t connected to municipal sewers. The tank holds sewage until a professional septic tank service can pump it out. Septic tank pumping involves three steps: inspection, pumping, cleaning, and flushing. Each step is important for maintaining a functional and effective septic tank.

Before the pumping process begins, the septic tank technician will conduct an initial inspection. This will help the technician locate the tank and its access points, typically maintenance hole covers or inspection ports. The technician will also examine the tank to determine the level of sludge and scum buildup. This information will help the technician determine how often the septic tank needs to be pumped.

Once the inspection is complete, the technician will use a specialized pump truck to remove the sludge and scum from the tank. The car has a large vacuum hose that is inserted into the tank through its access point and then activated to begin removing waste. The waste is then hauled away for disposal or recycling.

It’s crucial that homeowners understand how to properly care for their septic systems. This includes not flushing non-biodegradable items down the toilet, including cigarette butts, cotton buds or swabs, menstrual hygiene products, and condoms. These items can clog the septic tank and lead to expensive repairs down the road.

Homeowners who are concerned about the cost of septic tank pumping should consider setting up a regular service schedule. By following a scheduled routine, the tank will be pumped more frequently, which can significantly lower costs over time compared to infrequent pumping. The frequency of septic tank pumping should be based on the size of the tank, number of people in the household, and how much water is used.

Inspection

A septic tank inspection is an important part of keeping a septic system functional. It is recommended that septic systems be inspected every one to two years to check for any signs of problems. This allows for early detection of issues that may require system repairs or even replacement.

The first step of the inspection process is locating the septic tank. This can be done by looking for a 4” inspection pipe or manhole cover that are protruding above ground level.

Once the inspector has located the septic tank they will probe the tank interior and determine how much sludge and scum is inside. This will help determine how much the septic tank needs to be pumped.

The inspector will also inspect the septic tank for cracks in the walls and assess the condition of the inlet and outlet baffles. If the septic tank is suspected of having cracks, the inspector will dig up the access ports to examine them further and determine if they need to be repaired or replaced.

Next the inspector will inspect the distribution box, also known as a D-box, to ensure it is in good condition and distributing wastewater to the drain field in an even manner. This includes checking for cracked inlets or openings, structural integrity and wetness or sinkholes near the D-box that can indicate a problem with the system.

Lastly, the inspector will conduct a visual inspection of the septic drain field for any signs of ponding or green or black standing water that indicates a clogged leach field. The inspector will also probe the leach field for areas of effluent saturation.

Having your septic system regularly inspected can save you money on repairs and prevent potential health concerns. In addition, following proper septic tank and drain field care and maintenance tips can prevent a septic system failure, which can be very expensive.

Repair

Septic tanks dispose, filter and treat household waste for homeowners who don’t connect to a public sewer system. Wastewater is transported to the septic tank, where it separates into distinct layers: a scum layer made up of fats and oils less dense than water; an effluent (water) layer; and a bottom sludge layer where solids are decomposed by naturally present bacteria. Eventually, the septic system’s components carry the wastewater to the drain field, where it percolates into the soil and groundwater.

It’s important to have a professional inspect your septic tank and its components regularly, so you know whether it’s time for a repair. A septic tank that isn’t pumped out regularly can fill up and cause problems with your home’s plumbing. In addition, sewage leaks from the tank can contaminate groundwater supplies with bacteria, viruses, degradable organic compounds and synthetic detergents.

A common septic tank repair involves replacing the septic tank pump, which is necessary for efficient effluent movement to the drain field. The pump can also fail if there isn’t enough liquid flowing through the system. Another common repair is to replace the septic tank distribution box, or D box, which regulates flow to the drain field and prevents overflow and system failure.

The cost of septic tank repairs can vary widely depending on the type and condition of your septic system. A new septic tank costs about $10,000, while replacing the entire septic system can cost much more.

Some septic tank repair work can be done by homeowners who have the proper equipment, but others require professional attention. It’s always better to leave the septic tank maintenance to professionals so that you don’t accidentally damage your septic system or create more problems than you began with.

Having your septic tank inspected by a professional is an inexpensive way to ensure that it’s functioning correctly and keeping sewage out of the groundwater supply. You should also make sure that you or any third party service providers don’t accidentally break septic tank and leach field pipes by digging around the property. It’s best to map out the location of septic system components or mark them with stakes, so you don’t damage them when doing yardwork or installing landscaping features.

Installation

When it comes to septic system installation, thorough inspection and installation is key. A septic tank is a vital part of wastewater management for homes and businesses that are not connected to a municipal sewer line. Properly installed and maintained, septic systems can last 40 years or more without problems. However, septic tanks that aren’t well maintained can experience leaks and overflows that can cause serious damage to homes and property.

During the installation process, soil tests are conducted to establish what kind of soil is at the site and how well it will absorb waste water. The survey will also help the septic tank technician determine what type of septic tank is best for the home. Once the location and size of the septic tank is determined, excavation is done to dig the hole for the septic tank and pipes. The tank is then placed and the ground is backfilled around it. The septic tank is then sealed and inspected to ensure it is watertight. Once the installation is complete, the plumbing is run from the septic tank to the house and the drain field.

If you notice that your toilets are draining slower than usual or if you smell unpleasant odors in the home, it may be time to call for septic tank repair. A clogged or full septic tank can cause wastewater to overflow into your home and yard, which can lead to costly repairs or even environmental contamination.

A septic system works by first collecting all the household waste and sewage from the toilets, sinks and bathtubs. The heavy solids settle to the bottom of the septic tank and are broken down by bacteria into sludge. The lighter liquids and fats rise to the surface and form a layer of scum. After this, the partially treated wastewater is pushed out of the septic tank into the septic leach or drain field.

The septic leach field is a network of gravel trenches where perforated distribution pipes are laid. The wastewater is absorbed into the soil and eventually evaporates. If the septic system isn’t working properly, it can cause overflows that can ruin your home’s foundation, destroy landscaping and pollute local waters.