A well-maintained on-site sewage system can significantly boost property value. Homeowners can help by scheduling maintenance, keeping a service history, and practicing water efficiency. Click the Septic Tank Services Near Me to learn more.
The septic tank removes solids from household wastewater before it enters the soil absorption field. It is important to keep the tank pumped regularly. When a pumper arrives, make sure they access the tank through the large central maintenance hole. Pumping through the inspection ports can damage baffles and result in incomplete sludge and scum removal.
Septic tank pumping is one of the most important aspects of septic system maintenance. Over time, solid waste and sludge build up in the tank, leading to clogs and system failure. Pumping services remove these accumulated materials from the tank, which can extend the life of the septic system and reduce costs.
Most septic systems contain an underground storage tank for sewage waste in homes that aren’t connected to municipal sewers. The tank holds sewage until a professional septic tank service can pump it out. Septic tank pumping involves three steps: inspection, pumping, cleaning, and flushing. Each step is important for maintaining a functional and effective septic tank.
Before the pumping process begins, the septic tank technician will conduct an initial inspection. This will help the technician locate the tank and its access points, typically maintenance hole covers or inspection ports. The technician will also examine the tank to determine the level of sludge and scum buildup. This information will help the technician determine how often the septic tank needs to be pumped.
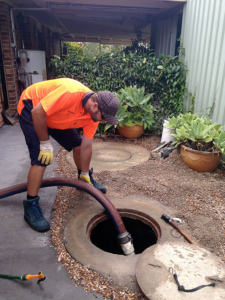
Once the inspection is complete, the technician will use a specialized pump truck to remove the sludge and scum from the tank. The car has a large vacuum hose that is inserted into the tank through its access point and then activated to begin removing waste. The waste is then hauled away for disposal or recycling.
It’s crucial that homeowners understand how to properly care for their septic systems. This includes not flushing non-biodegradable items down the toilet, including cigarette butts, cotton buds or swabs, menstrual hygiene products, and condoms. These items can clog the septic tank and lead to expensive repairs down the road.
Homeowners who are concerned about the cost of septic tank pumping should consider setting up a regular service schedule. By following a scheduled routine, the tank will be pumped more frequently, which can significantly lower costs over time compared to infrequent pumping. The frequency of septic tank pumping should be based on the size of the tank, number of people in the household, and how much water is used.
Inspection
A septic tank inspection is an important part of keeping a septic system functional. It is recommended that septic systems be inspected every one to two years to check for any signs of problems. This allows for early detection of issues that may require system repairs or even replacement.
The first step of the inspection process is locating the septic tank. This can be done by looking for a 4” inspection pipe or manhole cover that are protruding above ground level.
Once the inspector has located the septic tank they will probe the tank interior and determine how much sludge and scum is inside. This will help determine how much the septic tank needs to be pumped.
The inspector will also inspect the septic tank for cracks in the walls and assess the condition of the inlet and outlet baffles. If the septic tank is suspected of having cracks, the inspector will dig up the access ports to examine them further and determine if they need to be repaired or replaced.
Next the inspector will inspect the distribution box, also known as a D-box, to ensure it is in good condition and distributing wastewater to the drain field in an even manner. This includes checking for cracked inlets or openings, structural integrity and wetness or sinkholes near the D-box that can indicate a problem with the system.
Lastly, the inspector will conduct a visual inspection of the septic drain field for any signs of ponding or green or black standing water that indicates a clogged leach field. The inspector will also probe the leach field for areas of effluent saturation.
Having your septic system regularly inspected can save you money on repairs and prevent potential health concerns. In addition, following proper septic tank and drain field care and maintenance tips can prevent a septic system failure, which can be very expensive.
Repair
Septic tanks dispose, filter and treat household waste for homeowners who don’t connect to a public sewer system. Wastewater is transported to the septic tank, where it separates into distinct layers: a scum layer made up of fats and oils less dense than water; an effluent (water) layer; and a bottom sludge layer where solids are decomposed by naturally present bacteria. Eventually, the septic system’s components carry the wastewater to the drain field, where it percolates into the soil and groundwater.
It’s important to have a professional inspect your septic tank and its components regularly, so you know whether it’s time for a repair. A septic tank that isn’t pumped out regularly can fill up and cause problems with your home’s plumbing. In addition, sewage leaks from the tank can contaminate groundwater supplies with bacteria, viruses, degradable organic compounds and synthetic detergents.
A common septic tank repair involves replacing the septic tank pump, which is necessary for efficient effluent movement to the drain field. The pump can also fail if there isn’t enough liquid flowing through the system. Another common repair is to replace the septic tank distribution box, or D box, which regulates flow to the drain field and prevents overflow and system failure.
The cost of septic tank repairs can vary widely depending on the type and condition of your septic system. A new septic tank costs about $10,000, while replacing the entire septic system can cost much more.
Some septic tank repair work can be done by homeowners who have the proper equipment, but others require professional attention. It’s always better to leave the septic tank maintenance to professionals so that you don’t accidentally damage your septic system or create more problems than you began with.
Having your septic tank inspected by a professional is an inexpensive way to ensure that it’s functioning correctly and keeping sewage out of the groundwater supply. You should also make sure that you or any third party service providers don’t accidentally break septic tank and leach field pipes by digging around the property. It’s best to map out the location of septic system components or mark them with stakes, so you don’t damage them when doing yardwork or installing landscaping features.
Installation
When it comes to septic system installation, thorough inspection and installation is key. A septic tank is a vital part of wastewater management for homes and businesses that are not connected to a municipal sewer line. Properly installed and maintained, septic systems can last 40 years or more without problems. However, septic tanks that aren’t well maintained can experience leaks and overflows that can cause serious damage to homes and property.
During the installation process, soil tests are conducted to establish what kind of soil is at the site and how well it will absorb waste water. The survey will also help the septic tank technician determine what type of septic tank is best for the home. Once the location and size of the septic tank is determined, excavation is done to dig the hole for the septic tank and pipes. The tank is then placed and the ground is backfilled around it. The septic tank is then sealed and inspected to ensure it is watertight. Once the installation is complete, the plumbing is run from the septic tank to the house and the drain field.
If you notice that your toilets are draining slower than usual or if you smell unpleasant odors in the home, it may be time to call for septic tank repair. A clogged or full septic tank can cause wastewater to overflow into your home and yard, which can lead to costly repairs or even environmental contamination.
A septic system works by first collecting all the household waste and sewage from the toilets, sinks and bathtubs. The heavy solids settle to the bottom of the septic tank and are broken down by bacteria into sludge. The lighter liquids and fats rise to the surface and form a layer of scum. After this, the partially treated wastewater is pushed out of the septic tank into the septic leach or drain field.
The septic leach field is a network of gravel trenches where perforated distribution pipes are laid. The wastewater is absorbed into the soil and eventually evaporates. If the septic system isn’t working properly, it can cause overflows that can ruin your home’s foundation, destroy landscaping and pollute local waters.
